How to set up an e-mail account in Outlook 365?
To add an e-mail account, select “File” in the upper left corner of Outlook:

Then select “Info > Account Settings > Account Settings”:

On the Account Settings page choose “New…”:

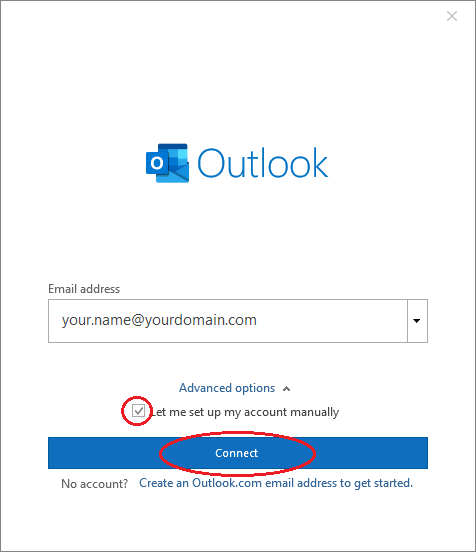
In the “Email address” field, enter your e-mail address, check the “Let me set up my account manually” box and click the “Connect” button:

Select “IMAP” as the email account type:

On the IMAP Account Settings page, please fill in the following fields:
Incoming mail
Server: mail.yourdomain.com (“yourdomain.com” replace with your own domain name)
Port: 993
Encryption method: SSL/TLS
Outgoing server
Server: mail.yourdomain.com (“yourdomain.com” replace with your own domain name)
Port: 465
Encryption method: SSL/TLS
NB! “Require logon using Secure Password Authentication (SPA)” options should be left blank.
When all fields are filled in, press the “Next” button:

Next, enter the password for the e-mail account, that you are currently setting up, in the “Password” field and click the “Connect” button:

When the account will be added, the following page will be displayed, click “Done” on this page to finish the process:

You can generate email settings using the tool at the following link:
E-mail settings generator
If an e-mail account has already been added to Outlook and you need to change the settings for that e-mail account, then the following instructions will help you.
In Outlook, select “File” in the upper left corner:

Then choose “Info > Account Settings > Server Settings”:

Incoming mail server settings can be found under the “Incoming mail” link:

Outgoing mail server settings can be found under the “Outgoing mail” link:
